这周的作业是
阅读一款微处理器的说明
制作电路板并编写程序使其运行
第一轮尝试: 自己制作 ISP
ISP 是为 AVR 芯片制作的编程器,这里有详细的 DIY ISP 教程。
依着教程画葫芦:
- 下载安装 Crosspack AVR
- Get Make
- 下载固件 FabISP Firmware for MacOS 10.8.2
- 解压固件,命令行进入解压后的目录
- 用编辑器打开 Makefile
将模式由 “avrisp2” 改为 “usbtiny”
也就是找到以下代码,将注释转移到 “avrisp2”那一行,然后保存文件
1
2
#AVRDUDE = avrdude -c usbtiny -p $(DEVICE) # edit this line for your programmer
AVRDUDE = avrdude -c avrisp2 -P usb -p $(DEVICE) # edit this line for your programmer命令行进入固件目录,输入命令
make clean如果正常,将返回结果
rm -f main.hex main.lst main.obj main.cof main.list main.map main.eep.hex main.elf *.o usbdrv/*.o main.s usbdrv/oddebug.s usbdrv/usbdrv.s但是这时出现了错误:
1
2
3
4
kidults-NMB:fabISP_mac.0.8.2_firmware kidult$ make hex
avr-gcc -Wall -Os -DF_CPU=20000000 -Iusbdrv -I. -DDEBUG_LEVEL=0 -mmcu=attiny44 -c usbdrv/usbdrv.c -o usbdrv/usbdrv.o
make: avr-gcc: No such file or directory
make: *** [usbdrv/usbdrv.o] Error 1好吧,忘记插我的 FabISP 到电脑了……插好后再试,ok 的:

下一步,需要设置 fuse,让板子能使用外部的 clock :输入命令
make fuse又出现了错误:
1
2
3
4
avrdude -c usbtiny -p attiny44 -U hfuse:w:0xDF:m -U lfuse:w:0xFF:m
avrdude: Error: Could not find USBtiny device (0x1781/0xc9f)
avrdude done. Thank you.
make: *** [fuse] Error 1查了一圈 google,搞不明白为什么。似乎是 GCC 编译问题,或者是我的板子有问题。第一轮尝试以失败告终。
第二轮尝试: 使用现成的 USBtinyISP
首先,下载 hello.ftdi.44.echo.c, hello.ftdi.44.echo.c.make 。然后将板子连接到 USBtinyISP:

此处需要吐槽一下 New MacBook,只有一个 typeC 接口,一开始 USBtinyISP 接上去灯不亮,以为是我的 typeC 转接口坏了。试了大半个晚上后放弃。第二天试了一下连在另一台 MacBook Pro 上,USBtinyISP 的灯又亮了。插回到 New MacBook,依然不亮,怀疑是不是数据线坏了,又折腾半个晚上。偶然间又发现,充满电再插 USBtinyISP 会亮……所以问题可能出在 typeC 转接口对 USB 供电不足……
折腾两三个晚上,终于到下一步。命令行进入前面下载好的两个文件的目录,输入命令:
make -f hello.ftdi.44.echo.c.make

Make 成功了。然后是 sudo make -f hello.ftdi.44.echo.c.make program-usbtiny-fuses
又出现错误提示:
1 | avr-objcopy -O ihex hello.ftdi.44.echo.out hello.ftdi.44.echo.c.hex;\ |
又开始到处 Google。查看了一下 fuse 的含义 :
What are the fuses?
There are 3 bytes of permanent storage in the chip called ‘fuse low byte’, ‘fuse high byte’ and ‘fuse extended byte’. These bytes are called fuses and can be reprogrammed as many times as you want and determines the behaviour of the chip. To do that, their value is not erased when the chip is powered off or reprogrammed.
Each microchip has its own definition for the values that must have the fuses.
将错误信息复制到 Google,找到了之前的fab note。里面让安装FTDI 芯片的驱动。然并卵,安装好驱动依然是错误提示。
肯定是板子出问题了。需要去实验室重新刻板子和焊电路。但是实验室扩建装修中,一眨眼几个星期就过去了………………
第三轮尝试
终于盼到实验室重新开放,在空气质量500的房间中刻板子,然后搜刮了元器件回家打算自己焊。好不容易把东西凑齐,开工后发现焊锡太粗太劣质,根本没法焊。重新买了焊锡线,开工后崩溃地发现,电烙铁没有买配焊台的,调不了温度,焊枪温度太高,很容易把板子上面的铜面焊焦了。可好的板子都用完了,还是没有重新作出电路板来。
等到周末,又去到实验室老老实实刻板子,焊元件。
电路板完成后,连上 USBtinyISP,终于 fuse 成功:

下一步
make -f hello.ftdi.44.echo.c.make program-usbtiny

现在,可以将程序烧录到板子上了。
照着教程下载 term.py,输入命令 python term.py /dev/ttyUSB0 115200,继续是熟悉的错误提示:
1 | Traceback (most recent call last): |
已经处在崩溃边缘,实验室的小伙伴提醒我用 Arduino 去烧程序。于是振作着继续尝试:
添加板子
打开 Arduino 的设置,在 “Additional Boards Manager URLs:” 里填上

然后找到菜单里的 “Tools > Board” ,打开 boards manager 。滚到列表底部,可以看到 “ATtiny”.
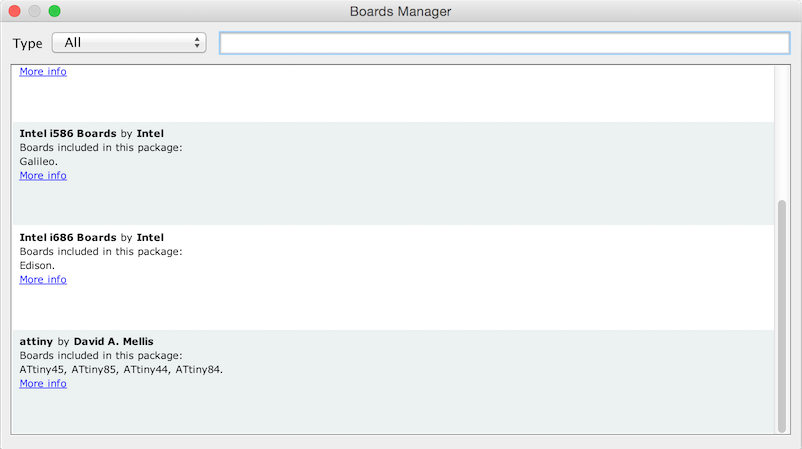
安装,然后关闭 boards manager。
设置
设置 board:”ATtiny”, Processor:”ATtiny44”, Clock:”20 MHz”, Port:”USB”

修改程序
Load Arduino 自带的 Blink example, 把 13 号引脚改为 7:

Burn Bootloader
成功了!

一周的作业用了快两个月才完成,觉得毕业希望已经渺茫…………
参考资料
- Programming an ATtiny w/ Arduino 1.6 (or 1.0)
- Use an Arduino as a FTDI Programmer
- classmate’s note1
- classmate’s note2
- classmate’s note3
- classmate’s note4